
Home / Church Livestreaming / Operator Path
Operator Path · Lesson 10 of 15
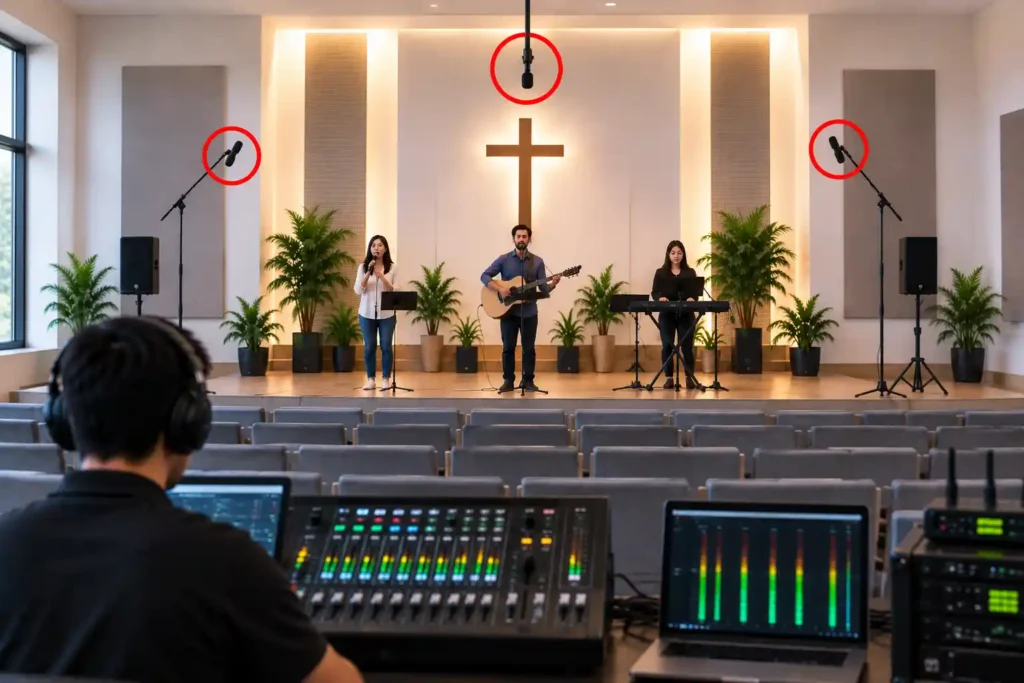
Once the mixer’s basic output and a separate stream mix are working, the stream’s audio is already clear and understandable. Speech comes through, worship music sounds balanced. Something is still missing, though: a viewer following online hears the performers, but almost never the congregation itself. Room microphones bring into the stream what close microphones never can — the sound of the whole room.
What room microphones add to the stream
Close microphones — the speaker’s microphone, instrument microphones — pick up only what they’re pointed at: not the congregation singing together, not the moment someone says “amen” out loud during a pause in the speech, and not the room’s own sound — the small reverberation created as sound reflects off the walls and ceiling of the sanctuary, which is part of what makes a space audibly recognizable.
A room microphone is a microphone placed to pick up exactly that — not a single sound, but the atmosphere of the whole room. When its signal is blended carefully into the stream bus, a person participating online gets something that close microphones alone can’t provide: the sense of being part of the same moment, rather than just watching a performance from a distance. Congregational singing, the quiet murmur of conversation before the service starts, the congregation’s shared “amen” — these are small things, but they’re exactly the things that make a gathering feel shared, not just watched.
Consider a situation where the congregation sings a worship song, and the entire audio level comes only from the musicians’ and singers’ microphones. On the stream, the music sounds like a polished performance from the stage — but it doesn’t sound like the room is full of people singing along. A room microphone brings that difference into audible range.
Why this is deliberately a later stage
Room microphones aren’t the first thing worth investing in when developing the stream’s audio, even though the sense of presence they bring sounds appealing right from the start. The reason is simple: room microphones solve a finishing problem, not a foundational one. Before it makes sense to add room sound to the stream, the stream’s basic output already needs to be reliable, and the stream mix already needs to be its own, adjustable whole, separate from the room mix. A room microphone added on top of a messy or unstable base broadcast mostly adds another variable to manage — it doesn’t improve the whole.
This course therefore recommends introducing room microphones only once the mixer’s basic output and a separate stream mix have already become an established part of the normal broadcast. This is also a natural point at which the volunteer running audio is already used to listening to the stream sound as its own thing, rather than learning that skill at the same time as new equipment.
The basic technical requirement: phantom power and free channels
Room microphones are typically condenser microphones, because they’re more sensitive and better suited to capturing a quiet, wide sound source — such as an entire room — than dynamic microphones are. Condenser microphones need what’s called phantom power to work. 48V is the most common option offered by mixers and is sufficient for practically all typical models, but the exact accepted voltage range is model-dependent — some models also work at a noticeably lower voltage. There’s no need to understand this at an electrical-engineering level — it’s enough to know that phantom power must be switched on for that particular channel on the mixer, or the microphone won’t work at all.
The other practical requirement is a free channel on the mixer. A room microphone needs its own channel, just as a speaker’s or instrument’s microphone does. If all of the mixer’s channels are already in use, adding room microphones will require either expanding the mixer or rearranging the existing channels before a new microphone can be brought into use. This is worth checking in advance, not only after the microphone has already been purchased.
Placement: far from the speakers
One principle matters more than any other when placing a room microphone: it must be placed far enough away from the room’s PA speakers. If the room microphone’s signal also travels back into the room amplified — for example, as part of the room’s own mix — it can begin circulating between the microphone and the speaker with increasing intensity, until feedback occurs: that familiar, unpleasant squealing or howling sound, one of the most common and most awkward problems in sound reinforcement. If the room microphone’s signal goes only to the stream bus and not back to the PA, true feedback can’t occur — but a room microphone placed too close to a speaker will still pick up the PA’s own sound so strongly that the stream audio ends up with echo, unclarity, or a disruptive delay relative to the close microphones. In either case, the solution is the same.
In practice, this means placing the room microphone somewhere like above or behind the congregation’s seating, far enough from the PA speakers, and preferably not pointed directly at one. The closer the microphone is to a speaker, and the higher its gain is set, the greater the risk of either problem. This is one of those situation-specific decisions where your own room’s floor plan and speaker placement determine the final position — no universal distance in metres can be given, because rooms and sound systems vary.
Iterative tuning — not right the first time
The right level for a room microphone won’t be found on the first broadcast. It helps to accept this in advance, so an imperfect first result isn’t seen as a failure. The right gain level depends on how full the room is, how strongly the congregation sings on a given Sunday, and how the room’s own sound behaves in different situations. This course recommends deliberately adjusting and listening to the room microphone’s level over the course of a few broadcasts, preferably from a recording afterward, before considering the setting finished.
The goal is to find a baseline level that works in most situations and to return to it only rarely, if the room or situation changes noticeably. Once that baseline is found, it’s locked in as part of the normal startup routine.
Risk: too strong a room microphone hurts speech clarity
The most common mistake when introducing a room microphone is setting the level too high. Because the point of a room microphone is to bring out something that would otherwise be missing, it’s tempting to raise its level until the sense of presence is clearly audible. This easily backfires, though: once the room microphone’s level rises too high relative to the close microphones, speech clarity starts to suffer. The speaker’s voice blends with the room’s reverberation and background noise, and it becomes harder for the viewer to make out the words — which is the single most important element of the entire broadcast.
A safe starting point is to keep the room microphone’s level clearly lower than the close microphones and raise it cautiously, listening especially to the speech segments, not just the music. If speech clarity starts to suffer, lower the room microphone’s level — the sense of presence is a good addition, but it should never come before speech clarity.
What to Remember
- Room microphones bring into the stream what close microphones don’t reach: congregational singing, the “amens,” and the room’s own sound — a sense of presence for someone participating online.
- This is deliberately a later stage: it’s worth introducing only once the mixer’s basic output and a separate stream mix are already established.
- Condenser microphones need phantom power (48V), and setting them up requires a free channel on the mixer — worth checking before purchase.
- Place the room microphone far enough from the room’s speakers to avoid feedback — your own space determines the exact spot.
- The right level is found only through fine-tuning over a few broadcasts, not all at once — and if speech clarity suffers, it’s always fine to lower the room microphone’s level.