
Home / Church Livestreaming / Operator Path
Operator Path · Lesson 6 of 15
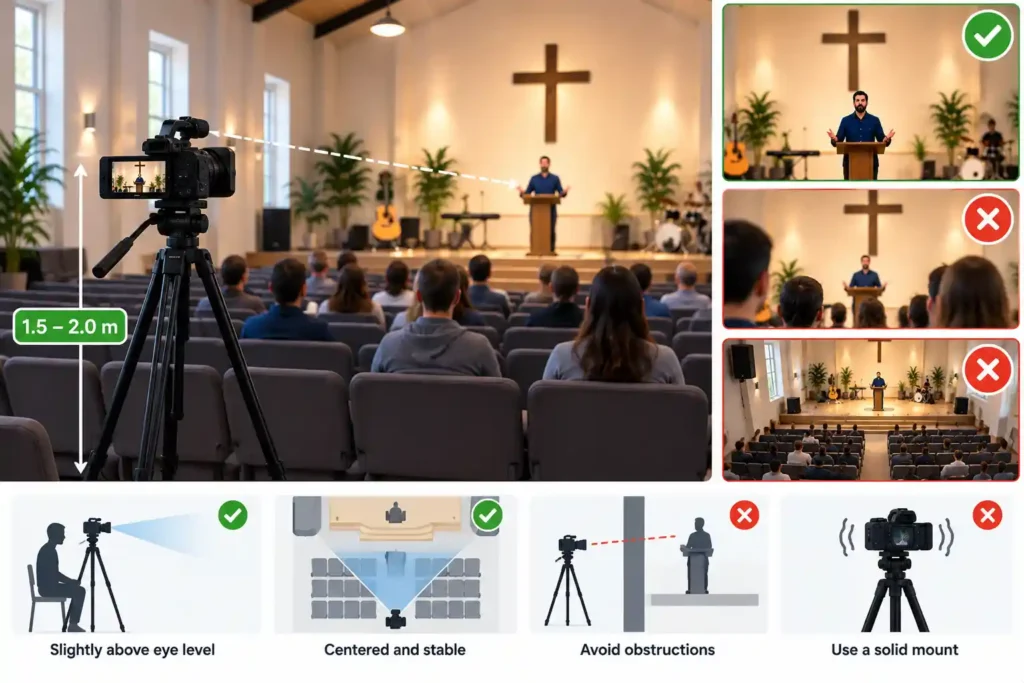
Once camera 1’s optics have been chosen and are known to reach a medium shot from about 20 metres (see the previous article, “How Much Zoom Do You Need?”), the next question is more practical: exactly where the camera should be placed and how it should be mounted. This isn’t a detail that can be settled on installation day based on whatever happens to be convenient. Where the camera is positioned directly affects the zoom needed, the stability of the picture, and even how the cabling should be routed. Doing this work carefully once, at installation, gives the viewer joining online a stable, correctly sized picture every Sunday — and no one has to rethink the camera position live.
Every metre closer helps
Optical reach is limited: a camera that fits the budget often lands exactly at the lower edge of the 20-metre medium-shot requirement, not comfortably above it. In that case, positioning is the only remaining way to increase the safety margin. Because the 35mm-equivalent focal length needed grows directly with distance, moving the camera position just a few metres closer significantly reduces the zoom required and brings back slack that the optics alone don’t offer.
The practical rule is simple: position the camera as close to the 20-metre default distance as the space allows — for example at 18–19 metres, not 22–23 metres. Every extra metre eats directly into the margin that would otherwise remain in the framing.
Consider a space where the originally planned camera position is on a balcony, 23 metres from the stage, because that’s where a power outlet happens to already exist. Moving the camera a few metres closer, even to a different spot along the balcony railing, meaningfully reduces the focal length needed and makes the framing looser and safer, without having to replace the camera.
The mount is not a secondary choice
When shooting at a long focal length, even a small movement shows up magnified in the picture. Vibration that goes unnoticed in the room can appear in the stream as clearly visible shake. This is why the structural rigidity of the mount isn’t a detail you can compromise on — a thin drywall partition or a light, freestanding stand isn’t enough for a lens in the 600-millimetre class. The camera should be attached to a load-bearing structure: a sturdy wall mount, or a stand heavy and well-supported enough to hold it steady.
Bass-heavy sound reinforcement and footstep vibration traveling through a church floor are especially typical sources that become visible at a long focal length, even though they wouldn’t register at all at a shorter one. The same applies to the mount’s own structure: a long, flexible arm or a loosely tightened joint will amplify even small vibrations, even if the attachment point itself is solid.
Test image stabilization at full zoom
A camera’s built-in image stabilization helps, but you can’t judge whether it’s sufficient in advance without testing it in exactly the situation the camera will actually be used in: at full zoom, on its final mount, under the same conditions as an actual stream. The test is done before the system goes live, not during the first Sunday’s stream.
In practice, this means testing the camera in position while the worship team plays at full volume. If the picture visibly shakes, the fix is a more rigid mount or a different camera position — not relying on image stabilization alone to correct it.
The cable route is planned alongside the installation
The length and route of the cable should be settled at the same time the camera position is chosen, not afterward as a separate problem. A good route runs clear of walkways, is protected from being stepped on or snagged, and is secured so it doesn’t hang loose or risk coming free mid-stream. When this is considered right at the installation stage, the camera position and the cabling support each other, instead of one later forcing a change to the other.
Height and angle affect the framing
Placement height and shooting angle aren’t just technical choices — they affect how the speaker looks to the viewer. As a general starting point, the camera should be positioned roughly at the eye level of a standing speaker, or slightly above it. Shot clearly from above, a speaker tends to look small and distant; shot clearly from below, the angle can feel odd to the viewer. The same practical test used to check image stabilization is a good moment to also assess height and angle — both are easier to adjust during installation than afterward.
What to Remember
- Position the camera as close to the 20-metre default distance as the space allows — every closer metre reduces the zoom needed and increases the safety margin.
- The mount must be structurally rigid; a thin wall or a light stand isn’t enough for a long focal length.
- Test image stabilization in advance at full zoom and under real conditions, for example at worship-music volume — don’t rely on it for the first time live.
- Plan the cable route at the same time you choose the camera position, not as a separate problem afterward.
- Position the camera roughly at the speaker’s eye level or slightly above it, to avoid an unflattering angle shot from too high or too low.